

I learned how to stencil a tile floor the summer of 2020. You know – the summer of Covid when all of us were finding new ways to love our home.
And by that I mean – the DIY’er came out in all of us that year!
Unless of course you already knew how to make improvements to your home all by yourself ;). If that was you, then you were probably frustrated with how crowded Home Depot got all of a sudden. Weren’t you?
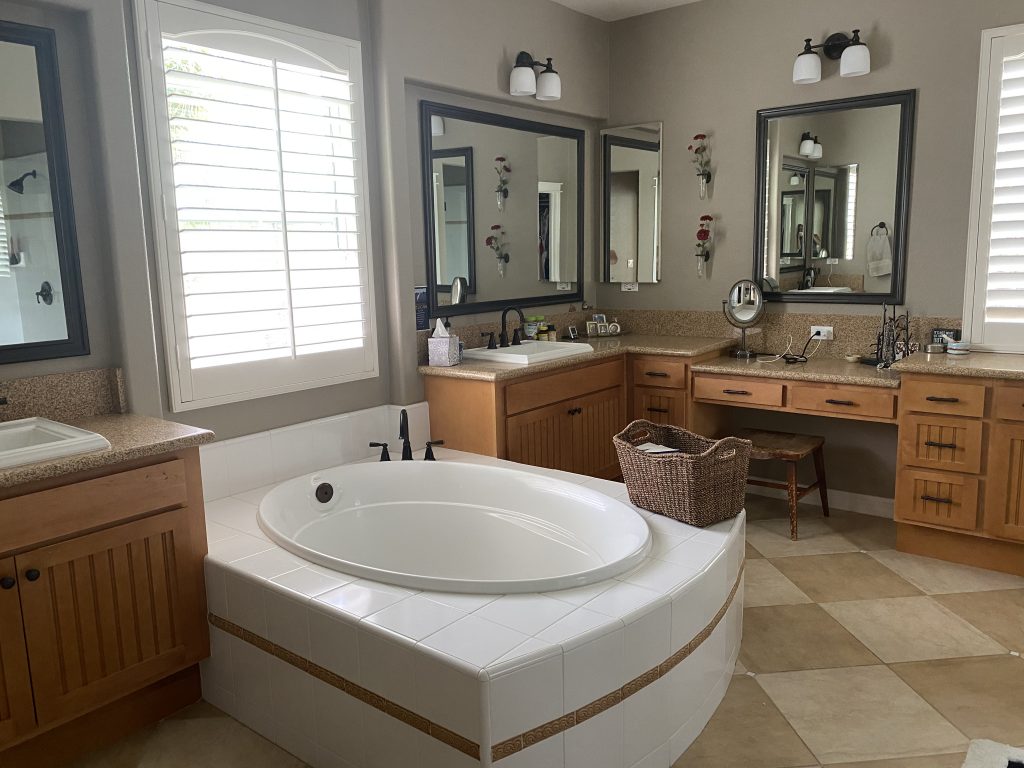
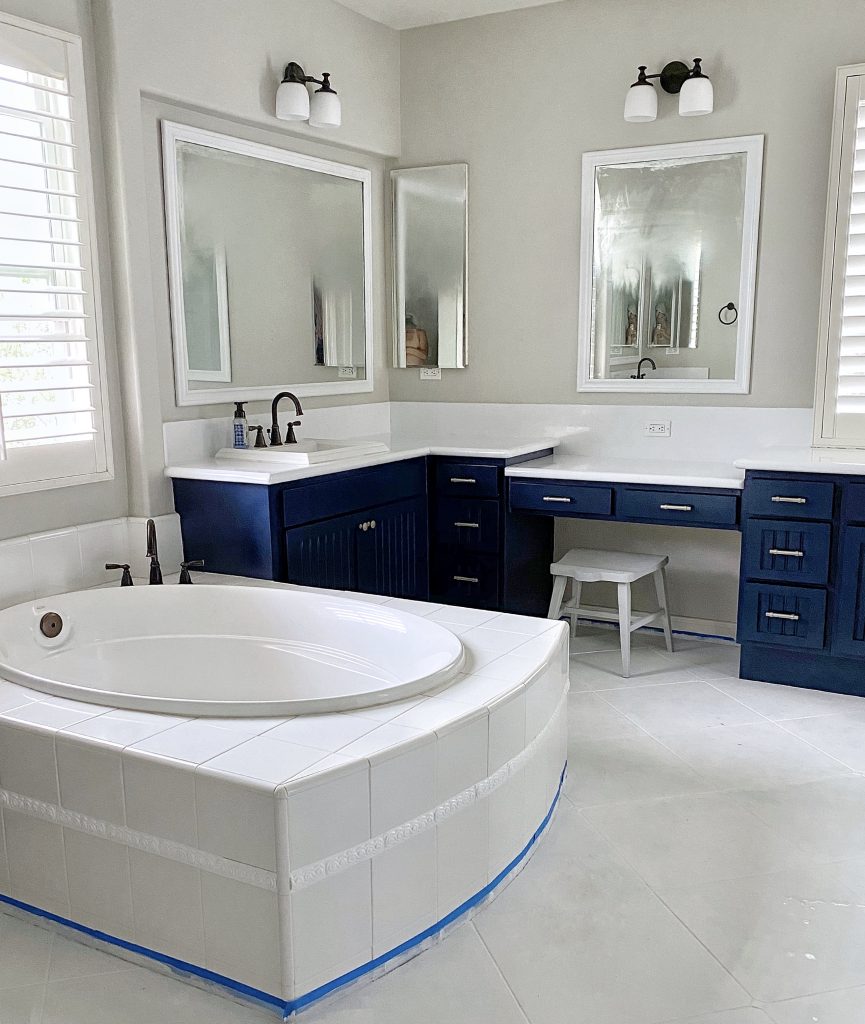
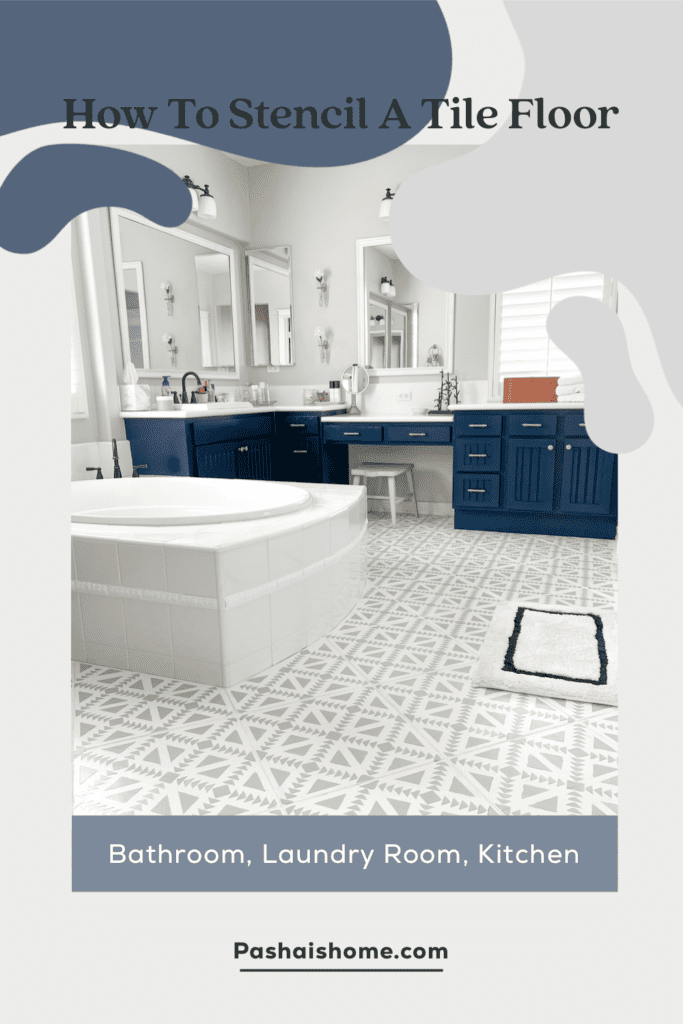
My solution to not being able to go to Greece to celebrate my milestone 50th birthday was to paint every square inch of my main bathroom. Because that outdated bathroom was just adding to my frustrations.
So I decided one morning in May 2020 to make some changes…
And lucky for you – my family helped me document my 50th birthday with pictures of me on the bathroom floor 😂.
As an Amazon Influencer, I earn from qualifying purchases. Some of the other links on this site are also affiliate links, which means I might earn a small commission if you love something as much as I do at no additional cost to you… but I only recommend what I actually like myself!
Read the full disclosure here.
In a rush?


Tips for How to Stencil a Tile Floor
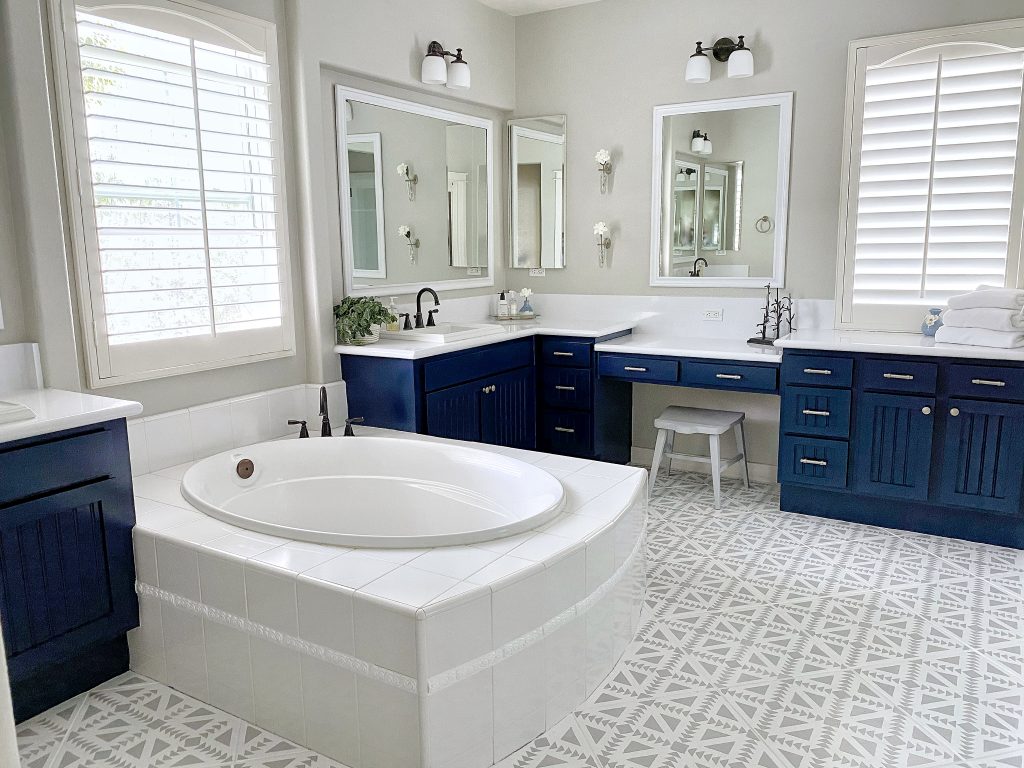
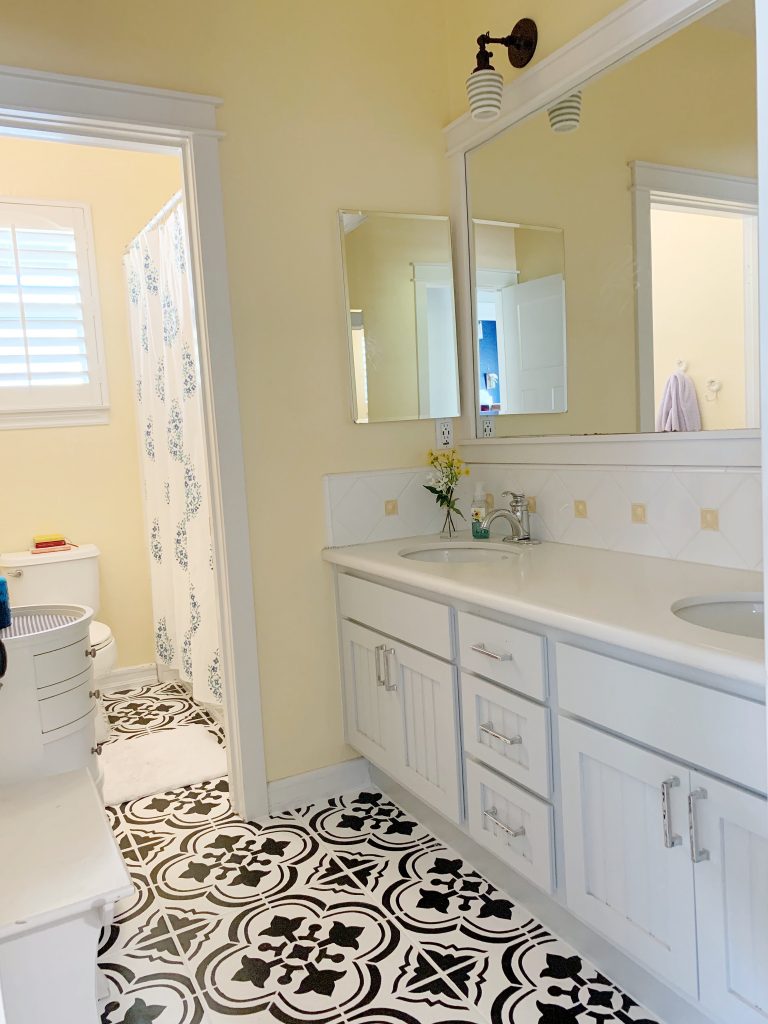
But First – Before & After Photos
Clearly the before:
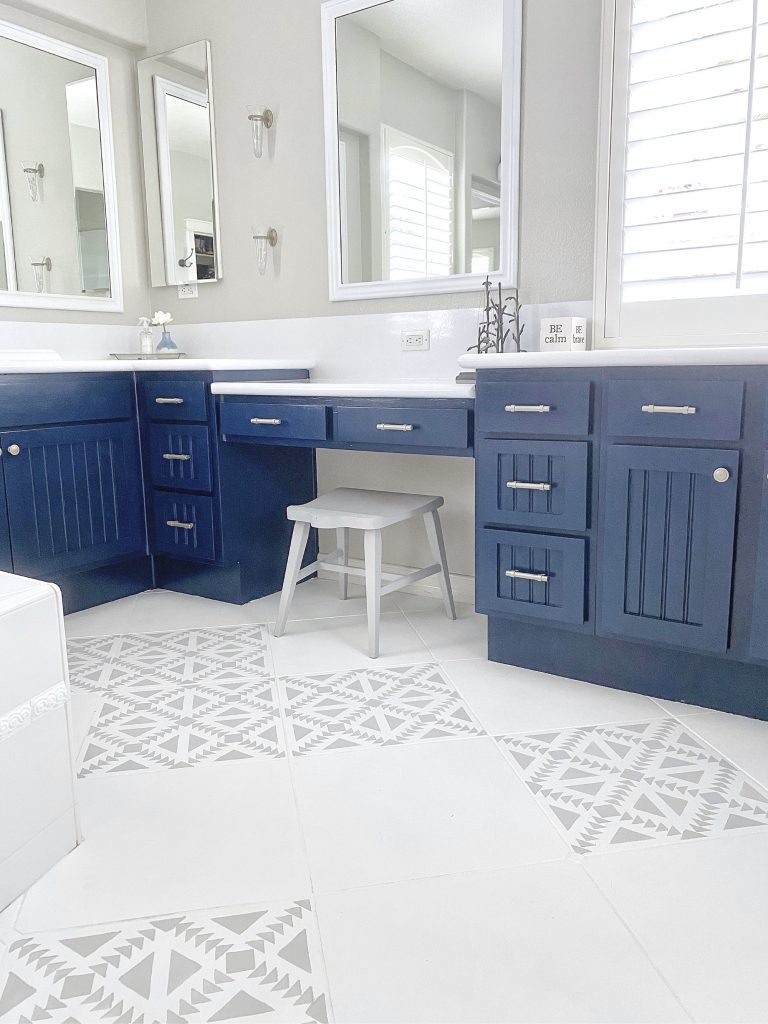
And the after :):
Products You Will Need
- Stencils
- 4 inch foam paint roller and refills
- Paint brush
- Stencil paint brush
- Painters tape
- Paint cups to hold mixed chalk paint
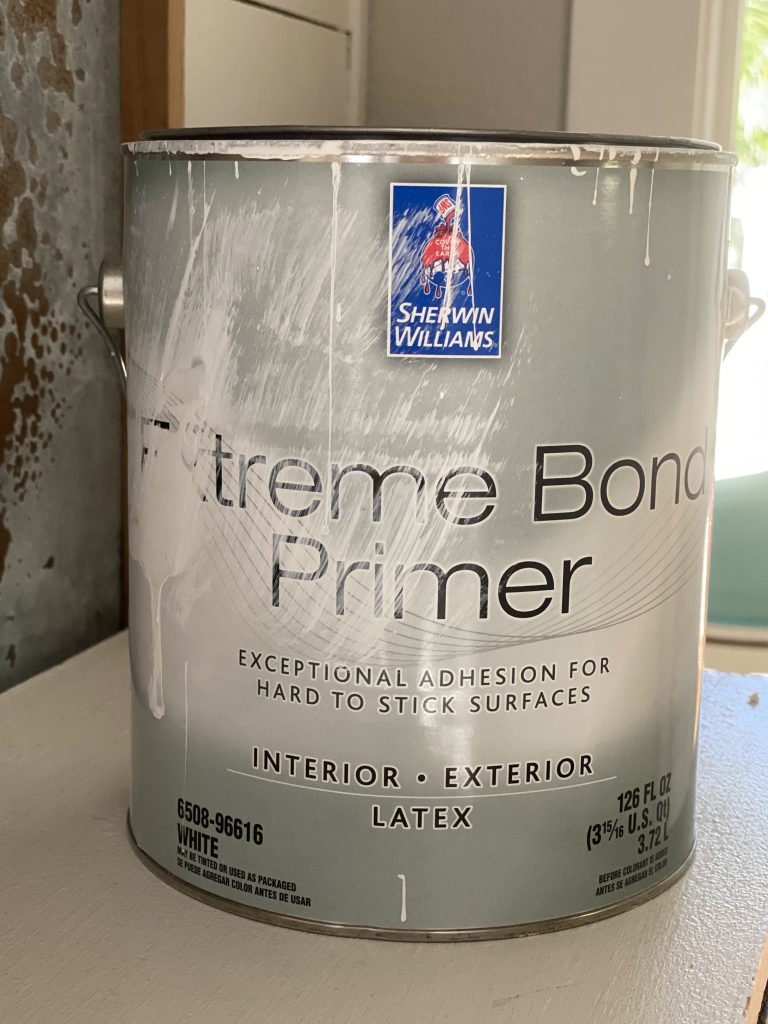
- Primer
- Flat white paint
- Chalk paint
- Polyurethane sealer
- Rags


Choosing a Stencil
I was very indecisive and rather uninformed as to which stencil size to use.
My floor tiles are 18 inches square and I assumed I had to buy exactly what was offered by the stencil company online. In this case – I figured 9 inch stencils was my best bet.
My lesson learned here is that if you reach out to Royal Design Studio and explain what your needs are BEFORE you buy any stencil. They can custom make exactly what you need!
Without having talked to them first (or anyone for that matter) – I ordered EIGHT 9 inch stencils. Because I knew I was going to want multiple stencils in order to finish this project in a reasonable time frame.
And when I received those stencils (which came very quickly btw- even with the COVID pandemic delaying everything!) I had questions regarding the borders of the stencils and how to place them on my tiles.
When I reached out via email to Royal Design Studio- they told me they could make me a custom 18 inch stencil with four squares of the design I wanted on one stencil!
I proceeded to order four of those then. So clearly I had ALOT of stencils to work with on this project.
But to be honest- I feel having multiple stencils in different sizes made doing this project so much faster and easier. And as you can see – my bathroom floor entails A LOT of square footage!!
Once you are done painting with the full tiles, you will start cutting up your stencils to get in all the weird spaces in the room. So being that I had many stencils to cut up- the project definitely went quicker than if I only had one!!
Steps to Paint & Stencil a Tile Floor
Step One: Tape Off the Walls and Cabinets
This is pretty much a standard with any paint job you are going to do but I figured I should put this in here just in case you forgot!
I used the usual blue Scotch painters tape but you can use any painters tape you prefer…
Step Two: Three Coats of Primer
At the same time that I primed my cabinets (before painting them SW Naval), I also primed the floors.
I did three coats of primer on the floors because of the brown nature to the tiles.
I used a 4 inch mini roller with foam rollers because of the smoothness of the tiles. However, the cutting in on the sides was done with a regular paint brush.
Each coat was given one day to dry before adding the next coat.

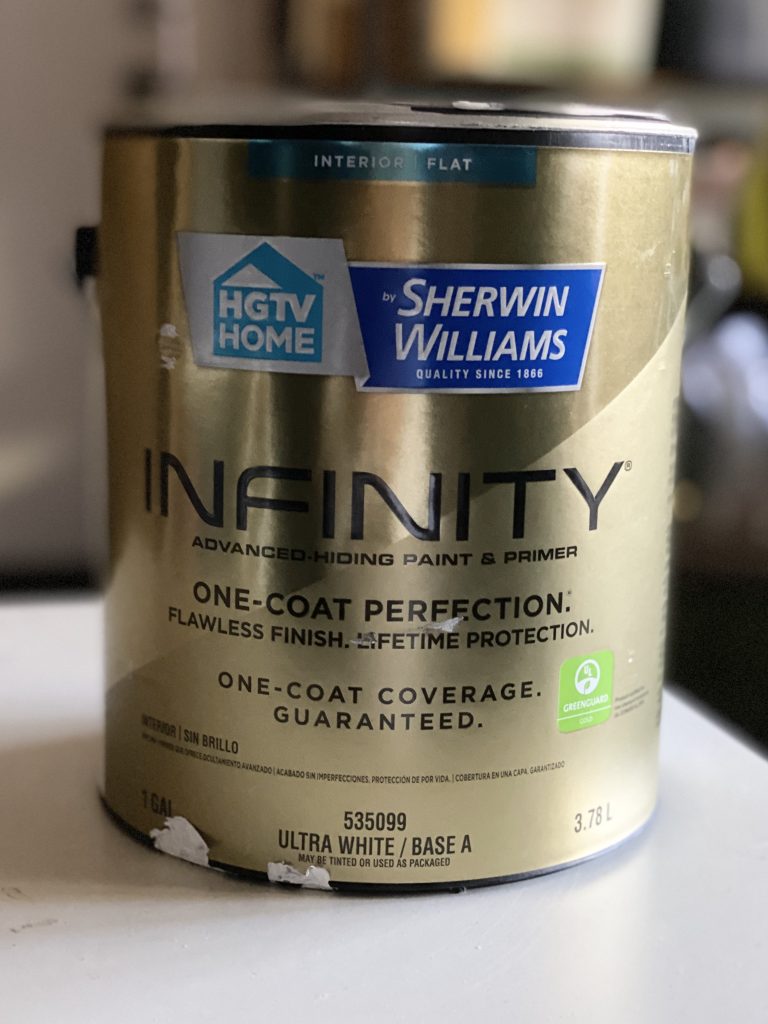
Step Three: Three Coats of White Flat Paint
After the primer was dry, I did THREE coats of Sherwin Williams Ultra White paint in flat with the same foam rollers. I also waited one day in between each of these three coats to make sure the floors were dry.
And I didn’t bother tinting the white paint- I just used a shelf white from Lowe’s called Ultra White.
However, I painted my cabinets SW Naval Blue BEFORE I used this white paint on the floors so that any blue drips on the primer could be covered up with the white paint ;).
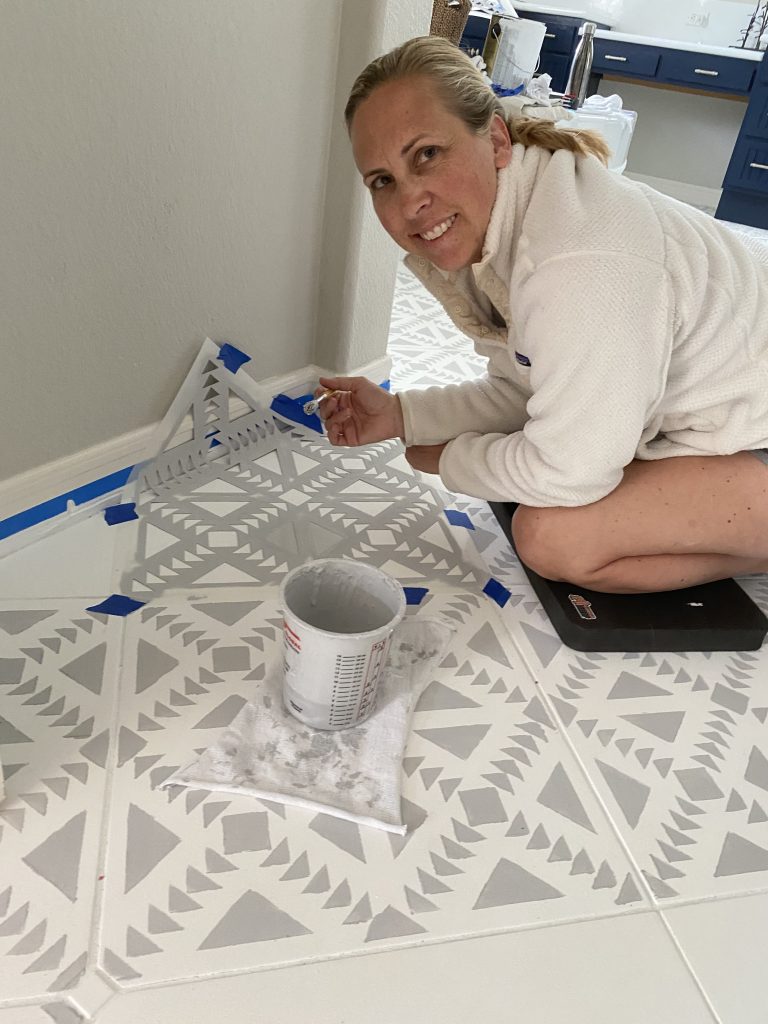
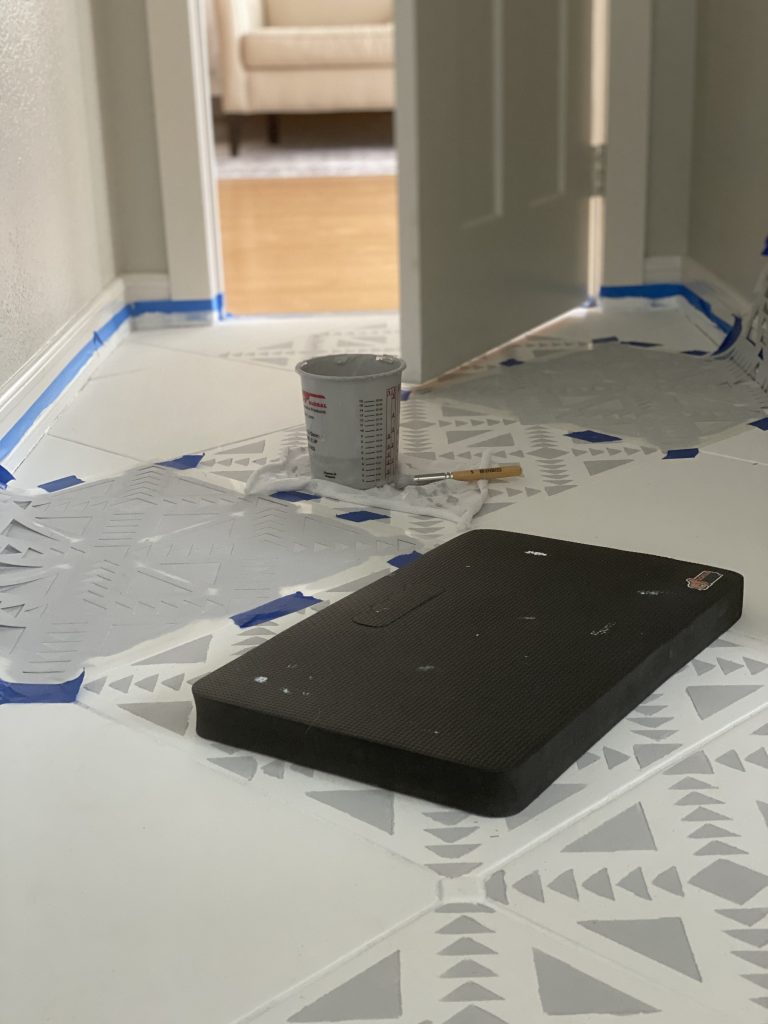
Step Four: Stencil Using Chalk Paint
I used a half and half blend of Rustoleum Chalk Paint in Linen White and Aged Gray for the stenciling part.
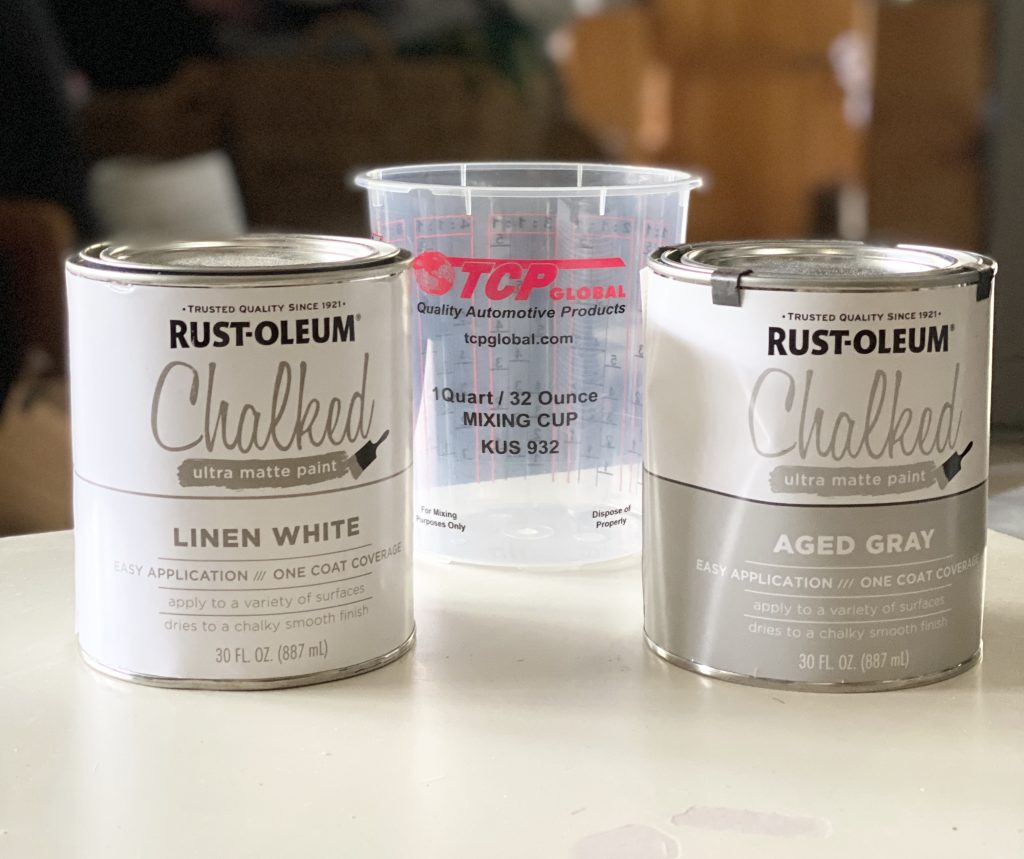
After watching my Instagram stories on this project, many people asked me why I used chalk paint instead of regular paint.
This was to avoid bleeding. Chalk paint is thicker and well basically more chalky than regular paint so the risk of heavy bleeding under the stencil is quite minimal with this type of paint.
Plus I knew I would be using a polyurethane sealant on the floors so I wasn’t worried about it rubbing off or chipping.
First I painted all the full squares with the bigger stencils.
Once I was done with this part, I was a tad overwhelmed with how many partial tiles were left 😳.
I made sure I had space to sit down and stencil without smudging any of the already done squares.
And boy oh boy was this slow going…
A super important tip to avoid bleeding while stenciling- USE VERY LITTLE PAINT ON YOUR BRUSH!
I used a special stenciling brush from Cutting Edge Stencils.
While I don’t really know if a special brush is necessary but again – I was really hoping to get the best results possible so didn’t want to take any chances.
I have seen people using a foam roller for this part but again- my bathroom floors are such a big space there was no way I wanted to redo any part of this project due to bleeding!

I did two coats on each stencil with the stencil brush and about twenty minutes in between each coat (one perk of using chalk paint is that it dries pretty quick!).
This is where it was super convenient to have so many of the stencils on hand. I was able to tape all the stencils down on the floor with painters tape (in the corners) at the same time.
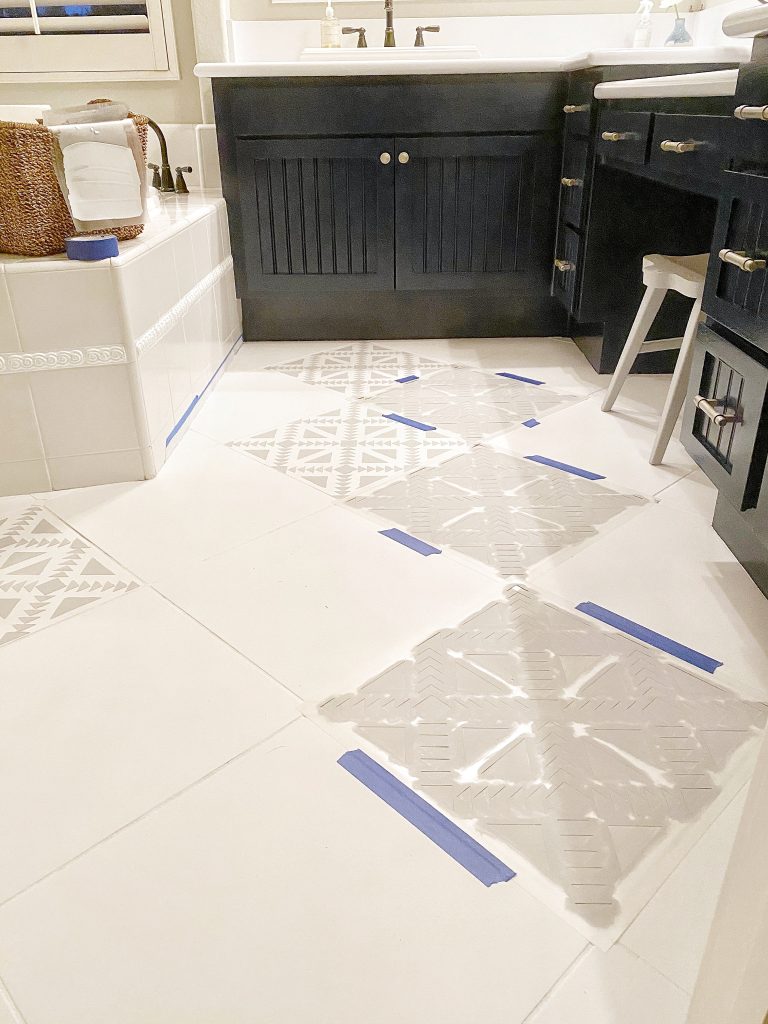
I was careful not to lift them up and move them until the paint was dry. This is a big reason why stenciling can take so long.
Honestly, I am not sure if this part was necessary but again I wasn’t taking any chances with bleeding!!
This part of the project took me a good week and a half to finish. Not full days every day but a good 4 hours a day on my hands and knees stenciling.
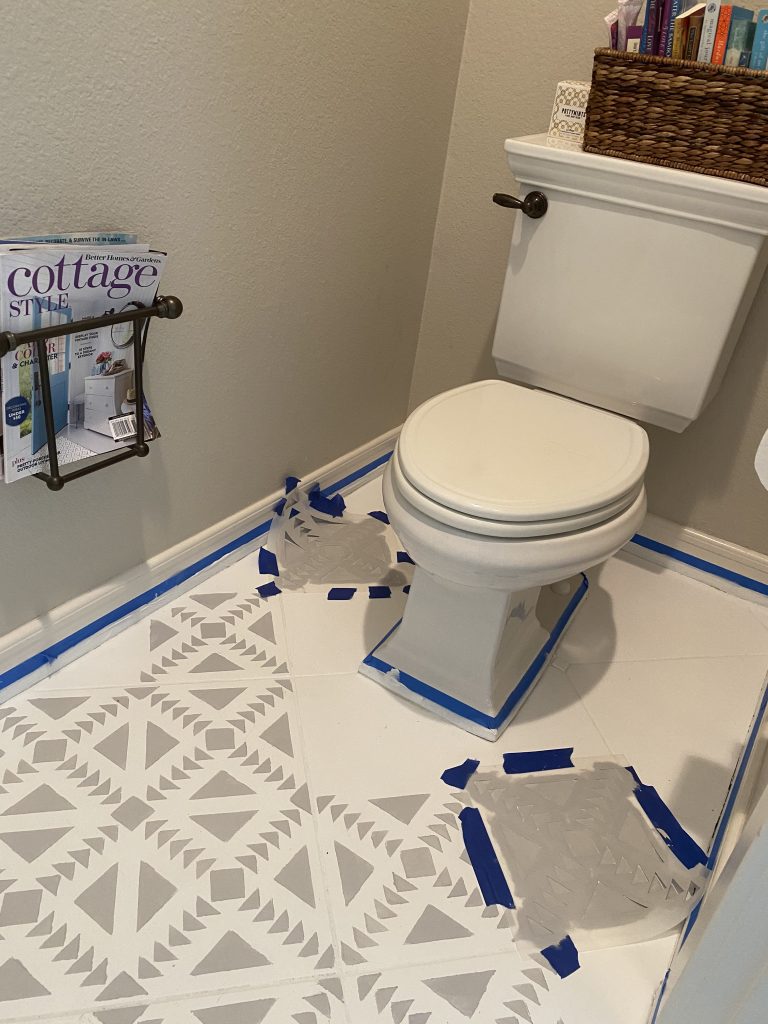
By the time I made it to the toilet room, I was pretty much over doing this project. And yes – at this point I am pretty sure I was thinking what the heck was I thinking???
The corners of the floor and walls were rather tricky. You need to smush the stencils up against the wall – so make sure you have painters tape protecting your wall where you do this.
Another tip that I didn’t do until a few days in – use a kneeling cushion for your knees!!
There is a lot of bending over on your knees when painting a floor and a gardening cushion will save your knees! Trust me! The link above came the day after I ordered it (thank God!).
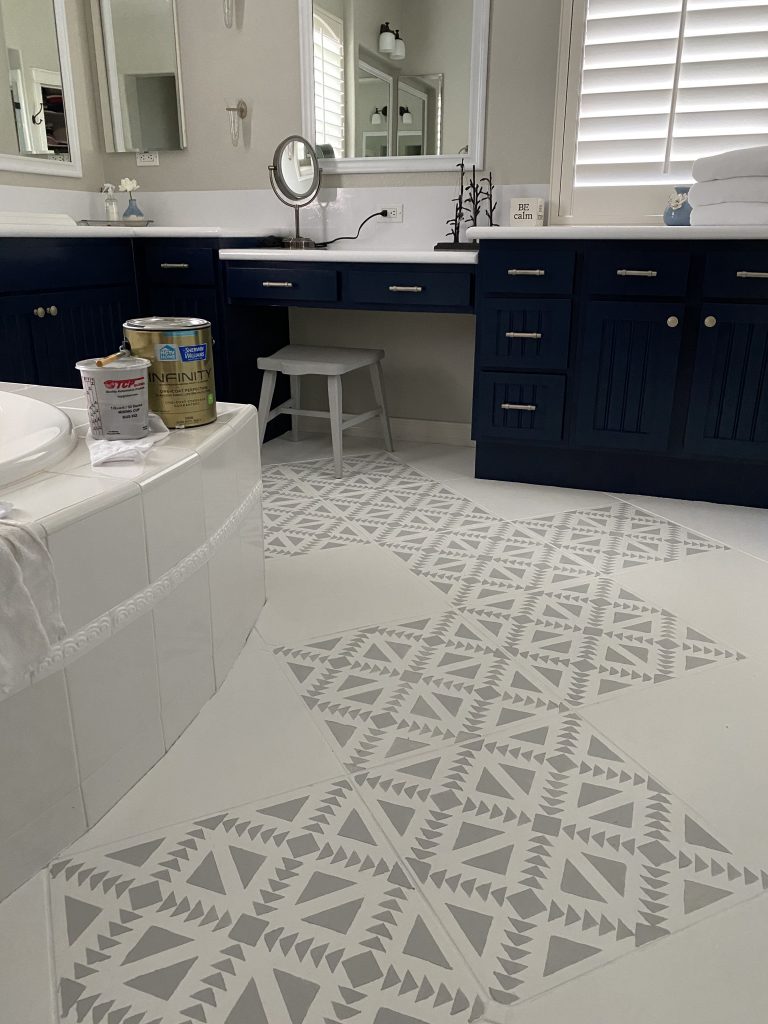
Step Five: Seal the Floors
Once the stenciling part was finally done (after about 1.5 weeks that is!) – it was time to seal the floors.
I wasn’t going to take any risks with scuffing or chipping this floor so I did FIVE coats of sealant.
The product I used was Varathane Polyurethane from Home Depot.
It is water based and by doing my research I learned it is not going to yellow. At least – it better not three years from now!
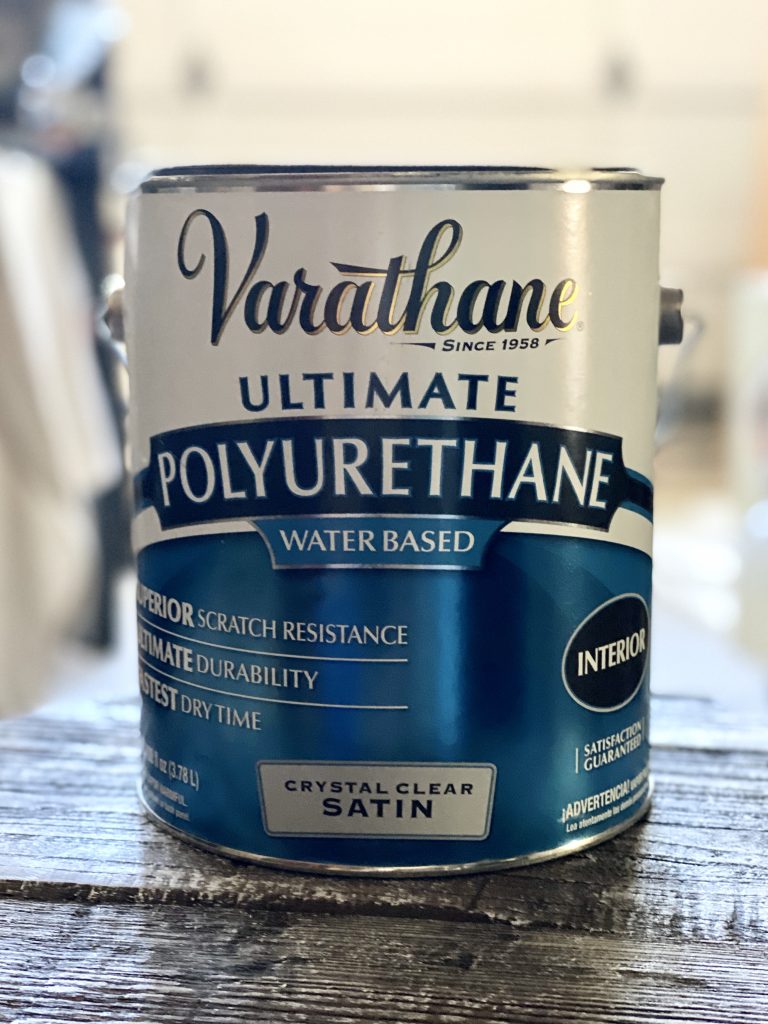
I had a REALLY hard time deciding between polyurethane and polycrylic and in the end just decided to go with polyurethane.
There are A LOT of opinions out there on which one works better, doesn’t smell, isn’t dangerous, doesn’t yellow, etc., etc. and I just wore myself out with anxiety over which product to use.
In the end the polyurethane worked just fine (and I never noticed any smell…).
Time will tell however if there will be any yellowing in the future…

I was so happy to learn that this product goes on clear and as long as you don’t leave large pools of it – rolling it on is crazy fast and easy (and at this point was a fun ending to this almost two month project!!).
Each coat of sealant took less than an hour to roll on with the same foam roller I used with the primer and paint (well – different foam roller though!!).
The FIVE coats went on quickly and easily within two days 😊.
I did five coats of sealer btw because my master bathroom is a high traffic area and I really wanted to make sure to protect against any scuffs, dropped blow dryers, etc.
Plus the coats went on fast and dried so quick – I figured the more the merrier!
Other Places in my House Where We Stenciled the Floor
Full disclosure – before I took on my master bathroom project myself, we had a good friend/handyman stencil the floors in my girls’ bathroom and my laundry room in 2018.
Soooooo I kinda had an example of how to stencil tile floors already as I was watching him do the project the entire time!
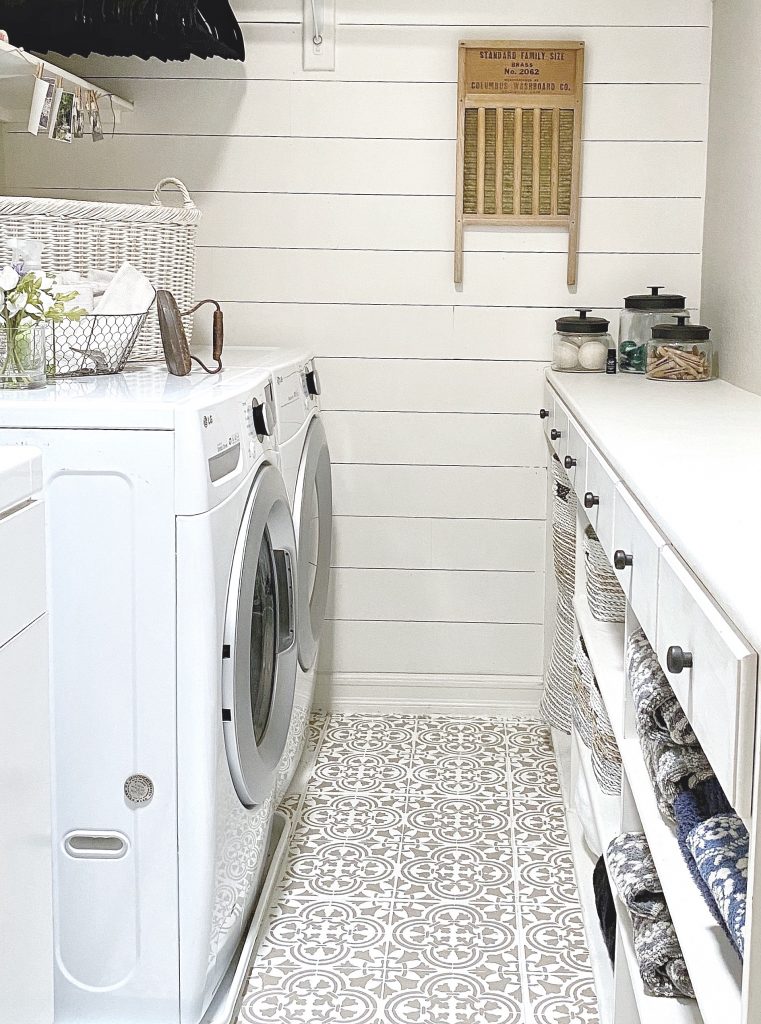
Both floors are still holding up GREAT btw!! So if you are trying to figure out how much time this update buys you before having to actually rip out your tile floors – I am already on year 4 and going strong.
Heck – I may never have to actually replace these tile floors!
And there you have it! It’s funny how you can look back at times in your life that seemed so overwhelming and see what you did to keep your mind off of what was going on around you.
Did you catch my blog post about how I did a DIY update to my master bathroom to forget all about the year I had been having so far by May 2020? You can read exactly what I did here!
In just one month, I had experienced the death of my brother in law to brain cancer, my husband being a frontliner during a worldwide pandemic, and a mudslide destroying my backyard.
The therapeutic nature of this bathroom remodel was probably one of the biggest reasons I was able to stay grounded and somewhat sane during those stressful months.
Sometimes it can be things like a simple painted bathroom remodel that surprise you the most…
Let me know if you end up tackling a stencil job as well. I would LOVE to see how YOU did!!
Looking for an item that wasn’t linked in this post?
Be sure to check out my ‘Home Tour’ pages or ‘my Curated Collections Shopping Pages’ here.
Did you find this post useful? Pin it to your boards – just click the Pin button in the upper left corner!

Home is where one starts from.
~ T.S. Eliot
Don’t miss any of my tips, inspiration, or stories! Follow me on Instagram, Facebook, and Pinterest!
As always, I love hearing from you!!
I make every effort to reply to every comment below. But if for some reason I missed it – please feel free to contact me here.
Have a wonderful day my friend! I hope something makes you smile today ;).


[…] Update your floors without breaking the bank thanks to this budget-friendly DIY […]
I love how your floor turned out, Pasha. It looks so good. I’d love to share a link to your post in my weekly roundup tomorrow.
Thank you Jen!! I would love for you to share 😉
These turned out gorgeous! Thank you so much for the tutorial:)
Thank you Tanya! Little bit of elbow grease but I am still loving them!!
This gives me so much hope! Our bathroom is in good shape but is in need of an update. I want to try stenciling the floors. Our tile is so dated. Your bathroom looks great Pasha!
yay! I cannot wait to see it Denise!!!
[…] Once I put all of those pieces of the bathroom back together- it was time to tackle the floor stencil. This process was quite time consuming and rather tricky. Instead of adding to this blog post here, I have decided to write a separate blog post about how to stencil a floor. You can find that blog post here. […]